This is the true story... of 5 interns. Picked to live in a yurt, work together and have their lives... blogged! Find out what happens, when people start learning about sustainability... and living in community.
Thursday, August 11, 2011
Natural Building Intensive: Days 2-3 of Dirt
On the second day, we learned two natural building techniques: wattle and daub & clay wattle. Wattle is basically weaving thin branches horizontally around larger vertical pieces. In our case, the thin branches we used were pieces of split bamboo, and the vertical piece was a whole bamboo reed. There was a bunch of it growing on the property, and much of it had already been cut and dried, so it worked out perfectly.
Bamboo wattle
Before we could start any form of wattle, we had to finish building the timber frames. The frames were built using 2 by 4's, into which we put 3 vertical bamboo rods. For the side wall, instead of weaving small pieces of bamboo through vertical bamboo (wattle & daub), we wove a mixture of clay and straw (clay wattle). To do so, we rolled the thick mixture into ~12 inch long "snakes", and wrapped it around the bamboo pole, blending it back into the clay below and beside it. Rinse and repeat. In no time you'll have a new wall.
Brittany & Brandon getting their wattle on
Wrapping the clay straw around the bamboo
Here's the back wall frame we built. The split bamboo will be woven around the 3 vertical bamboo rods on each side.
Working hard on the frame
The middle section (where Brandon is standing) will be filled with the adobe bricks we made the day before - but not before they fully dried. To ensure fast and proper trying, one of the first things we did on day 2 was flip and trim the bricks. We turned them on their side to help them dry faster and trimmed their edges so they were more fully rectangular.
our 100 or so adobe bricks drying in the sun
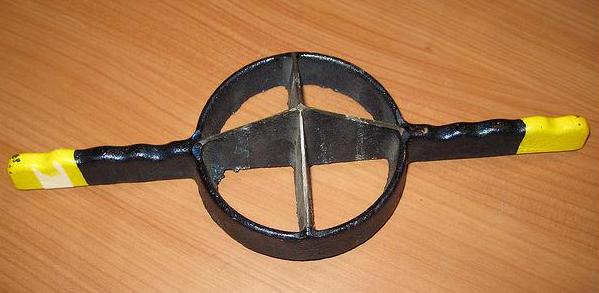
The bamboo used for the wattle was split into 4's using a pretty handy tool: Bamboo Splitter. I don't know the official name - but it's Japanese and it splits bamboo. If you're interested in a live demo, check out Eric on YouTube.
bamboo splitter
Once split into 4's, the bamboo pieces were cleaned with a knife (to smoothe the rough edges) and cut into smaller pieces with a saw to fit horizontally around the full, vertical bamboo pieces.
Cassie weaving wattle in the back wall. Looking good huh!?
Once we put the back wall up, wove all the wattle, it was time for the daub. We used a mixture of cut straw, clay, sand and water to make the daub; it was essentially a type of plaster. To apply, simply slather it on from the outside and push it through the cracks of the bamboo so it sticks, creating a more sturdy wall.
Because the bamboo was so pretty, we opted not to put daub on the inside walls, but rather to leave the bamboo exposed. But we did clean it up before it dried so that it wasn't "goopy" looking.
Next, we laid adobe bricks. Between each brick we put a layer of mortar (sand, clay, water) making sure it was level. For mis-sized bricks, we'd chisel it back into form.
Brick wall close up
We've also got some video footage of the brick laying:
Up next ... the final touches: spiral bottle design, "quick and dirty" front walls and plastering the whole thing. Watch it all come together ....


No comments:
Post a Comment